Draw Circle First for Head
How to draw heads from simple shapes
Learn how to depict heads from basic shapes - circles, squares, triangles and beans - and explore how very different characters we get.

Our first head shape is a circle. Round head is soft and friendly.
Tin can we accept a triangle for head? Of course – this ane is a funny looking comics head.
Next shape is a rectangle. Square head is great for strong characters.
Another shape to explore – a edible bean head. Depending on the proportions, you get some bully comics style results.
pencil
,
eraser
,
colour pencils
drawing paper
or
sketch volume
Love drawing? Never miss a tutorial!
How to draw round and friendly caput

We first with a simple and common head shape – a circumvolve. Round heads look soft, friendly and harmless – great for drawing kid faces or friendly characters. While hither we show a regular circular circumvolve, you can experiment and squash the circle into an oval. A tall or flat oval will give you lot a very different grapheme, while still keeping the friendly feel. Only enough talking – let's draw a round and friendly head!
Drawing the round head
Step i : Sketch the circle and confront cantankerous

Nosotros start our cartoon with a simple circle. Then we add the face cross – this will help us place the face – the eyes, mouth and nose – onto our head. Y'all tin can play with the positioning of the face cross, depending on which direction you lot want your character to look. Hither our head is looking up and to the right – this volition be the three-quarter view. If y'all want to run into some sample variations of the pose drawn here, check out the how to draw a confront tutorial.
Footstep 2 : Place the face features – optics, olfactory organ and mouth

Next we sketch the main features of our head's face – eyes, nose and oral cavity. Place the eyes on the horizontal face line. Play with the distance between the eyes, until they are just right. The summit of the olfactory organ is roughly where the ii lines cross. Keeping with the friendly circle theme, nosotros add a nice round nose. The rima oris sits on the vertical face up line, below the olfactory organ. In the real globe, the mouth would be symmetric on the line. Past moving it bit sideways here, nosotros gave our caput a dainty friendly smirk.
Step three : Finish drawing the head

We complete the head drawing by calculation the ear, drawing the eyes properly and completing the head outline. As you can tell, we are using very simple and basic optics, nose, mouth and ears hither. Afterwards all, this tutorial is about cartoon heads and exploring the various head shapes. But again, feel free to play with different shapes, sizes and forms for whatever off the facial features. Even with the simple confront, nosotros have some happy grin baby head fatigued right here! Fifty-fifty with such simple shapes, nosotros take managed to describe a friendly circular head!
Like this tutorial? Share it with others:
How to draw a head from a triangle

Our second caput is a bit if an experiment – can you draw a head from a triangle? Of form you can! We are definitely getting into a bit of comic mode exaggeration here, but look how well the caput worked out. Just to keep with the triangle theme, we are going to brand the optics, nose and mouth out of triangles every bit well. Let's get drawing!
Cartoon the triangle caput
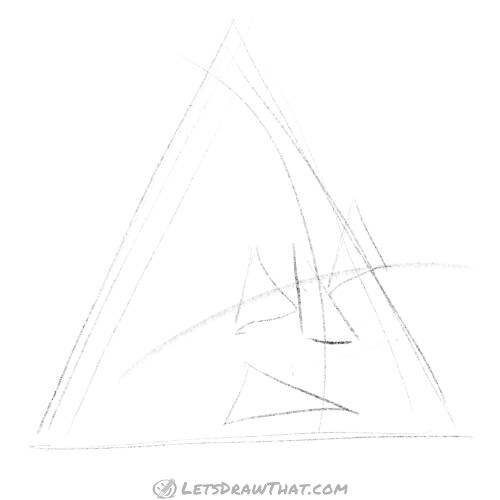
Footstep ane : Sketch the triangle and the face cross

I am certain you know past now, that we start with sketching the caput outline – this time it'south a triangle. Then we add together a confront cantankerous to help us with placing the face features. Here we go for a side view, with a relatively low vertical line, at about one third of the triangle tiptop.
Step 2 : Place the eyes, nose and oral cavity
Now we sketch the placement of the facial features. Let's run across if our triangle caput can also take triangular features! The triangle nose, equally usual, sits around where the two face lines cross. Next, permit's add triangle eyes – these sit on the vertical face line. Finally a triangle oral fissure – this 1 is a bit off the middle line, equally it is not a particularly symmetrical smirk.
Step 3 : Finish drawing the caput
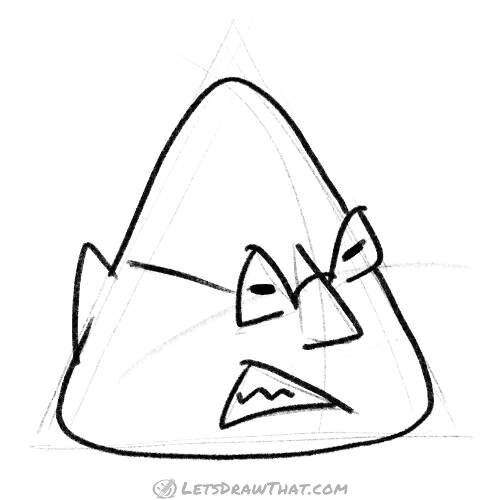
Time to describe our triangle head properly. Let'south outset with the nose – we only outline two sides of the sketched triangle for a simple olfactory organ. Next, we depict eyes – let's do them only simple squeezed apartment lines. Since the triangles for eyes look more than like spectacles – let'south add together a line over the bridge of the nose and a line on the side. We will finish the confront with a triangular mouth – let'south add together a little zigzag to prove the angry oral fissure squeeze. Finally, depict an ear and consummate the head outline. We desire a comic man, non a robot, so we round the abrupt corners on the caput a flake. Too, the lesser chin line is not completely straight simply arched out a fleck. And we are done – this is a one angry marshmallow caput man!
Like this tutorial? Share it with others:
How to draw a square head for a strong man
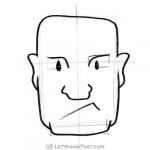
For our third caput, we will go with a rectangular shape. A square is a perfect shape for strong male heads. We likewise alter the position of our caput – this one is a simple front caput-on view. As y'all tin can see, we apply the same simple technique to draw the head, only only by choosing a different base head shape, we stop up with a very unlike character.
Drawing the foursquare head
Step 1 : Sketch the rectangle and confront cross

Same as before, permit'due south kickoff with the base head shape – a rectangle this time. Again nosotros add the face cross to aid us identify the face features. This time we are cartoon two directly lines. The vertical one splits the caput shape perfectly in half – that will give us the straight on, front head view. Yous tin can play with the position of the horizontal line – placing it upwardly volition give your head a bigger chin, placing it down a bigger brain! Hither we go for nigh the normal carve up, slightly above one-half manner up.
Step 2 : Place the face features – eyes, nose and rima oris

Time to sketch a face for our head and improve on the unproblematic foursquare. First we sketch and identify our eyes. Going with our square theme here, lets make them a rectangles likewise. Now a trick! Allow'southward add a square chin at the bottom of our square head. Every stiff man needs a strong square chin! Next, permit'southward add ears – they sit roughly at the eye level – on our vertical face line. The nose and mouth sit down symmetrically on the vertical face line. Permit'southward become for something simple, but in line with the stiff male person character we are building here. A nice wide nose and a elementary tough man smirk line for a mouth.
Step three : Complete the head drawing

Fourth dimension to finish our head drawing. Permit's draw the eyes properly first – squarish eyebrows and a simple dot for an centre. Outline the chin next, and then the head. We need to round the corners a flake to get a human head. (On the other hand, who is to say that you can't have sharp corners? If you lot are after a robotic look, they would exist perfect.) Our guy is bit bald – merely cartoon hair is another tutorial. So we will say that the toughest of the guys always shave their hair. It gives them an reward in a fight – no one can grab them by the pilus!
Like this tutorial? Share information technology with others:
How to draw a head from a edible bean shape
For our last experiment today, we will draw a caput from a edible bean shape. As with all the other shapes, you lot tin play with how wide, alpine and bent your edible bean is, and you will get very unlike results for different proportions. Our head is a narrow tall bean, and we ended upwardly with a cheeky looking grapheme. Let'due south learn how to draw him!
Drawing the bean caput
Step 1 : Sketch the caput shape and a face cross
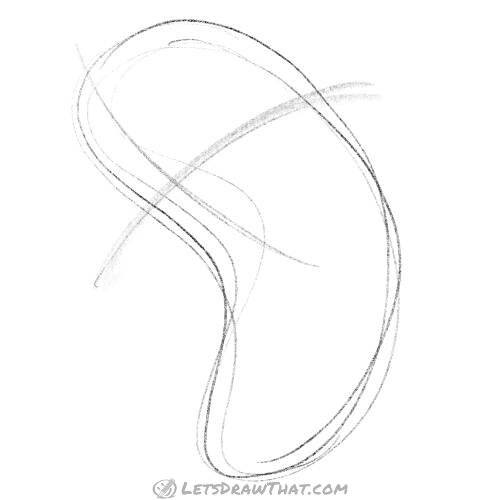
Every bit usual, we start with the shape for the head – a narrow alpine bean. As mentioned, you tin can play with how wide, tall and bent is your edible bean, as well as trying unlike angles, to get some very dissimilar results. Similarly, you tin experiment with the placement of the face cross. Here we are placing it on the upper half and drawing a downward looking face.
Stride 2 : Sketch the eyes, olfactory organ, oral fissure and ear

After we have the basic shape of the head sketched, we get-go adding facial features. A funny looking bean head begs for a funny nose – allow united states make it long and pointy. As usual, we beginning cartoon the nose where the two face lines cross. Add two simple eyes on the horizontal line and an ear on the same level. Our big nose volition become well with a big, exaggerated oral cavity.
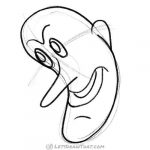
Pace 3 : Consummate cartoon the edible bean caput

Nosotros add together few more details to make our head more interesting – a wrinkle line over the eyes, a tooth line in the mouth and a lilliputian chin marking. So information technology's time to consummate the head outline and our bean head is done! This i has turned out to be a bit of a cheeky looking graphic symbol.
Like this tutorial? Share it with others:
Source: https://letsdrawthat.com/how-to-draw-heads/
0 Response to "Draw Circle First for Head"
แสดงความคิดเห็น